In the first of the series, Nik Cook looks at how to pack and what other pre-trip preparation you need to think about…
If you’re going on an overseas trekking trip, then getting your kit right, along with ensuring you’re physically prepared, should be top of your priorities. Nothing is more frustrating, or unnecessary, than failing to summit or complete a route because your kit or personal logistics wasn’t up to scratch.
Get your pack right
You should take as much care buying your pack as you do buying your boots. Trying on in-store is an imperative so don’t be tempted by cheap internet deals. The advice and care you’ll receive in a specialist shop is priceless. Fit is everything especially if you’re at the taller or smaller end of the scale. If you have doubts about size, opt for smaller. If you have a massive pack then you’ll just fill it with stuff you don’t need.
Packing Basics
Pack, pack and pack again until you’re 100% happy that your pack is balanced and comfortable on your back, you know where everything is and you could find any bit of kit even in the dark or in a driving storm. Keep over night kit and spare clothes in the bottom of the pack and stuff you might need during the day, such as waterproofs, at the top. Heavy items should be kept nearer the top of the pack and close to your spine. If you’re going on training hikes, pack your full kit. This’ll not only get your body use to carrying the weight but will allow you to fine tune your load. That irritating dangling strap won’t bother you in your sitting room but will drive you mad after a few hours on the trail. External bungees and straps can be great for securing items such as trekking poles but you don’t want to end up with the outside of your pack looking like a kit store. Keep the outside of your pack as gear free as possible and your packs “profile” narrow. Getting gear snagged on branches is really annoying and, on narrow trails, wide loads can be extremely dangerous.
Waterproofing
No matter how waterproof a pack claims to be, don’t believe it. Even waterproof over covers can’t be trusted and don’t cope well with high winds. Few things are more dispiriting than getting to the end of a hard day finding your top of the range down sleeping bag a soggy mess. You’ll struggle to beat the performance and versatility of the humble black bin-bag so make sure they’re top of your kit list along with some Duck Tape and cable ties.
Kit List
Make a list and check it twice (at least!!). If you’re going on an organised trek then many companies provide their own list. Use it as a starting point for your own list but don’t view it as gospel. Talk to friends who’ve done similar trips, go on web forums and talk to knowledgeable shop staff. Your list should evolve and, as you go through practice packs and training hikes, continue to do so. Continually question every item and ask whether you really need it or if you could improve on it. When you come to your final pack, physically tick every item off as it goes into your bag and don’t leave anything to chance.
First Aid
Ubiquitous on every trekking company’s kit list and most people simply opt for the convenience of chucking in a pre-packed commercial kit without even checking what’s in it. Although good, go through those kits with a fine toothed comb and you’ll find stuff you won’t need and some glaring omissions. Use a clear zip tie pouch to put together a personalized, lightweight alternative. Ditch any items that are replicated in other parts of your kit. You don’t need an extra pair of scissors if you’ve got a multi-tool. A few basic bandages (triangular and crepe) will be enough along with some strips of adhesive dressing, some melanin pads, tape and antiseptic wipes. For blister care, some hydrocolloid dressings such as Duoderm are essential. Don’t forget anti-diarrhea pills and some sachets of electrolyte salts for fluid replacement. Take a selection of painkillers and a tube of topical antibiotic ointment such as Neosporin. Discard all unnecessary packaging and really pare down both weight and volume.
Flights/Travel
Even the most meticulous planning and preparation can be undone by lost baggage. Although at many trekking destinations lost kit can be replaced some items are simply irreplaceable. Always travel in your boots and put expensive/bespoke items in your hand luggage. If your pack is small enough, use it for hand luggage and push your carry-on allowance to the limit. Keep a copy of your final kit list in your hand luggage so, if the worse does happen, you can easily work out what you’re missing.
Nothing New
We all love shiny new kit but everything you take on your trek should be thoroughly tried and tested on your training hikes. That super-duper all singing jacket might look infinitely better than your old faithful and slightly battered waterproof but don’t be tempted into a last minute “upgrade”. The mountainside isn’t the place to be fitting a new pair of crampons for the first time and 99% of the time fancy gadgets and gizmos are just extra weight. If there’s a particular trail food or energy drink you get on with and import restrictions allow, don’t gamble on finding it out there or trying a local alternative, pack plenty with you.
Strip it down
You can mock kit weight obsessives with their cut down toothbrushes but it’ll be them laughing as the altitude kicks in. A few grams shaved off here and there soon adds up and, if you adopt a ruthless approach to unnecessary weight, you can easily save yourself a few kilos and significant kit volume on a multi-day trek. If you’ve got money to spend on kit make weight your priority. 200g saved on a sleeping bag, 100g on a sleeping mat and 300g on a lightweight cook-set and stove, that’s over half a kilo in three bits of kit. Remove all excessive packaging on food and any unused straps on your pack. Do you really need that many base layers, fleeces or changes of socks? Once you’ve got your pack weight down, don’t undo all your good work by chucking in a brick like GPS unit or spare camera lens.
Keeping moving
You can always spot experienced trekkers. Not just by their neat and compact packs but by their systems that allow them to continually keep moving. Food and drink are always to hand in waist or chest pouches and they’re not continually stopping to adjust their clothing or get something out of their pack. Unnecessary stops soon add up and cost valuable time and energy. Pack in a way that minimizes stopping and avoids the need to be hefting your pack on and off. Training hikes are the time to find, refine and practice these systems.
Equipment set-up: Rucksacks/daysacks
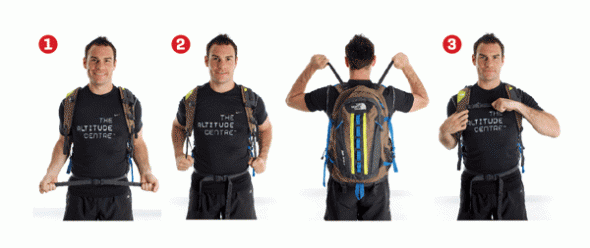
Ensuring your equipment is comfortable and fitted properly is the first priority when preparing for your walking training. Take time to select a well made rucksack that has a capacity of around 25-35 litres and train with some weight in the rucksack. Ensure that your rucksack has a lumber support strap, adjustable shoulder straps and a chest strap. Put the backpack on your back and adjust in this order. This will help the weight of your pack to be more evenly distributed across your body.
FITTING YOUR RUCKSACK
1. Lumber Support Strap
- Put the pack on your back so that the lumber support strap is resting over your hip bones and close the clasp and tighten it.
- Make sure the straps wrap around your hips comfortably and is not too loose and not too tight.
2. Shoulder straps
- Pull down on the ends of the shoulder straps to tighten them
- Shoulder straps should fit closely and hold the rucksack against your back, but they should not be carrying the weight.
- Adjust the load lifter straps (located just below the tops of your shoulders) so that the weight of the rucksack is off your shoulders.
3. Chest strap
- Adjust the chest strap to a suitable height across your chest then fasten the clip
- Tighten the strap until the shoulder straps are pulled in from your shoulders, so that your arms can move easily.
4. Re-adjust where necessary
- You may find that you need to take tension off the shoulder straps for the pack to feel totally comfortable. Each time you go walking ensure that the rucksack is appropriately fitted to encompass your clothing. Get practising with a rucksack that has weight in it – preferably 2-3 litres of water as well.
- The way in which your rucksack is packed is also important. Packing heavier items in the middle of the backpack as close to your back as possible will put less strain on you when carrying your rucksack and will also mean that your centre of gravity is correct.
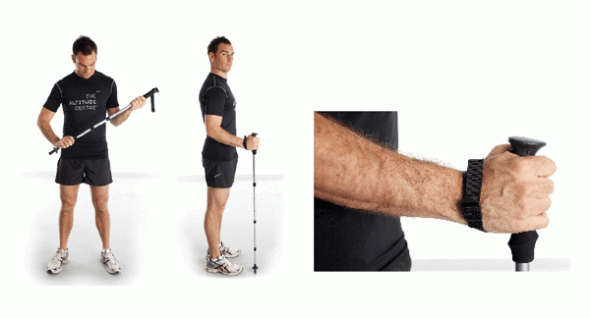
Equipment set-up: Trekking poles
Walking/trekking poles provide good additional support when walking over uneven terrain and also help to take stress away from your knees.
Wrist loop
- Firstly put your hand through the loop from underneath and then hold onto the handle.
- Make sure that the strap is then at the correct length – short enough to offer support, but not so tight that it is uncomfortable. The strap does the work, not your gripping of the handle!
Length of pole
- On flat ground set the length of the pole so that your elbow is at around 90 degrees when holding the handle .
- As the terrain changes, it is best to set the length of the pole depending on the terrain. On accent shorten the poles, whilst on descent lengthen the poles. If the terrain is difficult, then pack the poles away so that you have maximum balance with free hands.
Using the poles
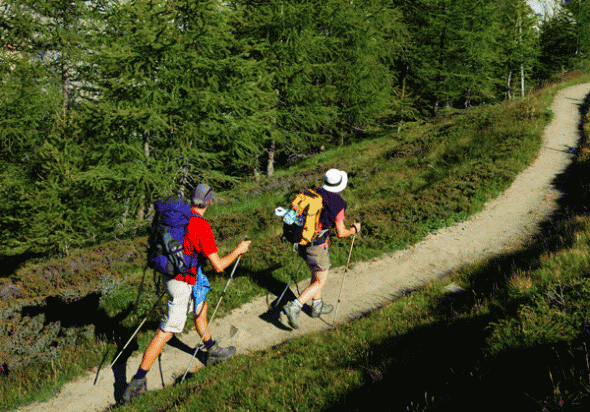
- Don’t grip the handles too hard and let the strap do all the work and have a relaxed grip and let the pole swing naturally as you walk and use the opposite pole to the leading leg
 ABOUT THE AUTHOR
A Peak District-based journalist and triathlete, Nik enjoys fell running, mountain biking and climbing on a daily basis. He has completed the Marathon des Sables, the Himalayan 100 and Canada’s 6633 Ultra.
RELATED LINKS
Training for trekking, part 2
www.thealtitudecentre.co.uk


Comments
Excellent narrative for preparing and training for trekking… will study, train and use!