


Noone has commented on this article yet.
Filed under:
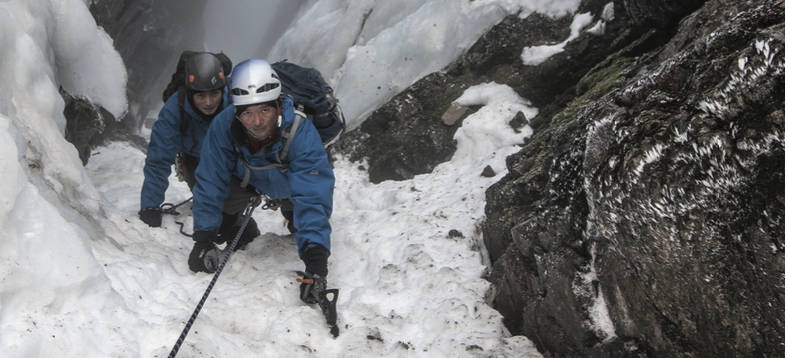
All Skills, Mountaineering, Ski Touring, Skills & Advice, Winter skillsThe ascent of a gully will often be the first introduction to snow climbing for many mountaineers. By their very nature, gullies tend to take lines provided by natural breaks and seams in the cliffs, and these can often be at a reasonably easy angle. As such, many gullies are in the lower grades of climbing difficulty, and provide an excellent way for novices to start to learn about snow-craft, winter ropework and climbing skills.
Having said this, there are a great deal of gully routes that take improbable lines up terrifying sections of rock, offering all sorts of challenges such as huge chockstones, hanging ice and blank rock steps. They are also a channel for debris, as snow, ice or rocks dislodged from above will be funnelled down the line of the route, making life for anyone lower down the gully very unpleasant, to say the least.
Equipment
No particular specialised equipment is needed for climbing gullies, at least at the lower end of the grade scales, with the main exception being the addition of a second ice tool, such as a hammer, to complement the axe already used for general mountaineering. It is very handy to have a matched pair of tools, in other words an axe and hammer that are similar in length, style and weight. This allows you to climb smoothly and efficiently, knowing how each tool will feel when placed.
The heads of the tools can have either a normal or a reverse curve to them, depending upon your current and future aspirations. A normally curved pick will be fine for easy to mid-grade routes, but if you are progressing towards harder climbs a reverse curve will be found to be beneficial. This will help to ease the retrieval of the pick after each placement, making ascent a lot easier and saving precious time and energy, as taking a classic curve pick out of hard snow or steep ice can be tricky when it is swung in too hard.
The same goes for crampons as for axes. Most general purpose crampons will be adequate for lower graded climbs, as long as they have front-points, but should you decide to attempt harder routes, a good pair of technical 12-point crampons, robustly designed and made with steep climbing in mind, will be needed. These will obviously need to be fitted to suitably stiff-soled boots, often utilizing a step-in binding system rather than straps for convenience. As far as the boots themselves are concerned, they need to have a good quality sole block and it should not be possible to bend them by hand. If you can, they are too soft for serious winter use.
Either a single or double rope system can be used, with the former simpler to handle and the latter better from a protection point of view for steeper, more technical routes. Protection during the climb will most often be provided by rock anchors, as these give good security when well placed. However, a deadman and a couple of ice screws may also be carried.
A deadman provides a very useful belay anchor on snow slopes, with the advantage that your ice axe is not buried, such as when using the axe to back up a bucket seat belay. If you really have to, the deadman can also be used to protect a section of ground where no other anchors are available, sited in the snow and clipped as a running belay.
Ice screws are handy if there is likely to be any ice encountered, and this will be particularly likely where melt-water has been running over the top of exposed slabs or down the front of jammed boulders.
Belaying
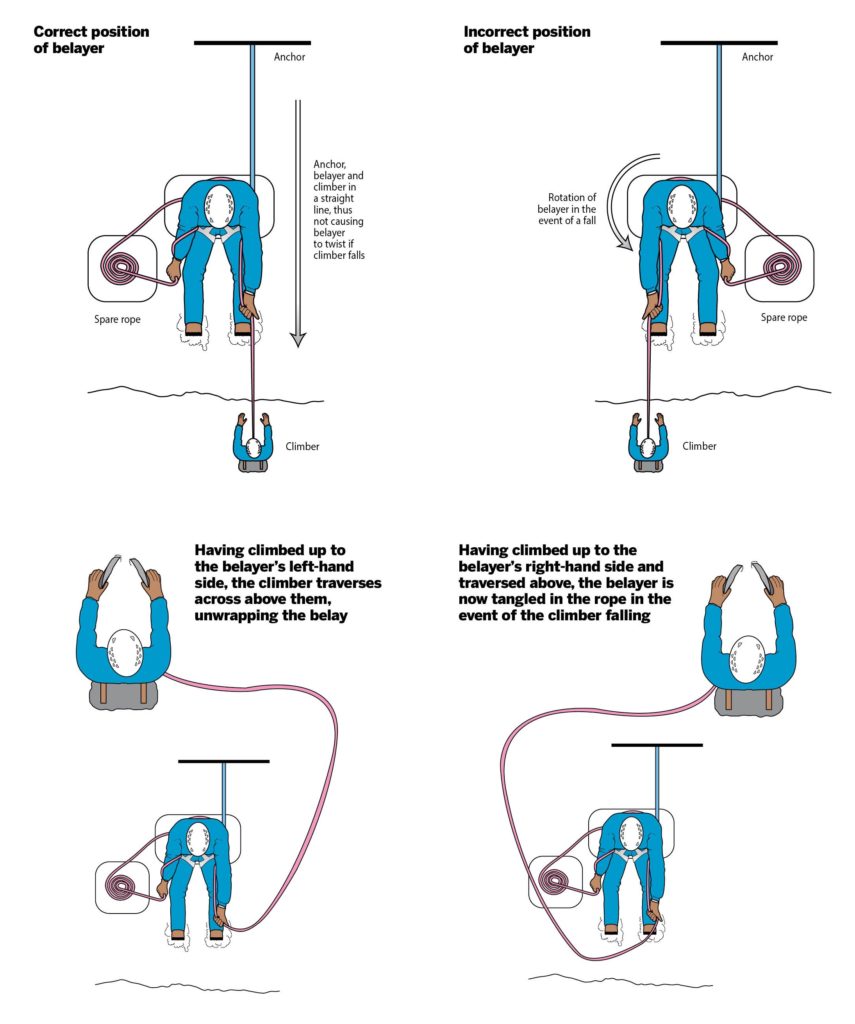
All of the belaying techniques described in the ‘Basics’ section are relevant for use in gullies. However, if a snow or ice anchor is being used, it is important to use an indirect or waist belay if any shock-loading, such as when holding a leader fall, could be experienced. There is a very important consideration here, in the manner that you are tied on to your harness and then to the anchor. Imagine sitting in a bucket seat with a buried axe anchor, with the rope from the anchor coming to you under your left-hand side, but the live rope to the climber coming out from your right-hand side. If a long fall were held, there would be a severe twisting motion applied to you as the rope pulls itself into a straight line between the anchor, your harness and the climber. This could result in you being pulled from your stance, losing control of the rope, and also sustaining severe back injury as you are violently twisted round. It is essential that the rope coming to you from the climber is on the same side of your body as the rope coming in from the anchor.
Another important consideration is the direction that the route above will be taking. If your second climbs up to you, retrieves the gear and then leads on through to the next pitch, the direction that they take is critical to the safety of both of you, and you must plan ahead to keep things in order.
Let’s say that you are belaying in the centre of a gully, facing out and using a waist belay. If the climber comes up to your left-hand side (as in the diagram), takes the spare gear from you and leads on, should they move across the gully behind you and then fall off, they will have unwrapped themselves from your waist belay and you would not be able to hold them. Conversely, if they approached you from below and to your right and then traversed across above you, this would have the effect of wrapping the rope around you. A fall in this situation would mean that you could easily be injured by the rope running around your upper body or neck, it being pulled tight with their body weight.
It is very important, therefore, to plan ahead and decide not only which side of the gully will be appropriate for the belaying as regards the direction of the next pitch, but also which hand to use to hold the dead rope. This will need to be worked out in advance of constructing the anchor, in particular which side of the bucket seat the anchor rope should be running in to.
Another consideration will be the safety of the belayer. Gullies being debris chutes, it would be foolhardy for a belayer to be standing directly below the main section of a pitch, unless absolutely unavoidable. Taking a stance to one side, ideally with a convex section of rock just above to serve as protection and hopefully deflect any falling snow or ice, would be the best thing to do. Helmets are absolutely essential, as is alertness from all party members. The leader should be aware that if they dislodge any debris they must shout ‘Below’ to warn others that there is a risk of being hit.
If conditions are such that a good deal of snow, ice or rocks are dislodged during the early stages of a climb, it would be best to abandon the attempt for the safety of everyone involved. Climbing snowy gullies in warm weather can also be very dangerous, as rocks in particular, levered from the main cliff by the action of ice during a freeze, will be channelled towards anyone climbing below.
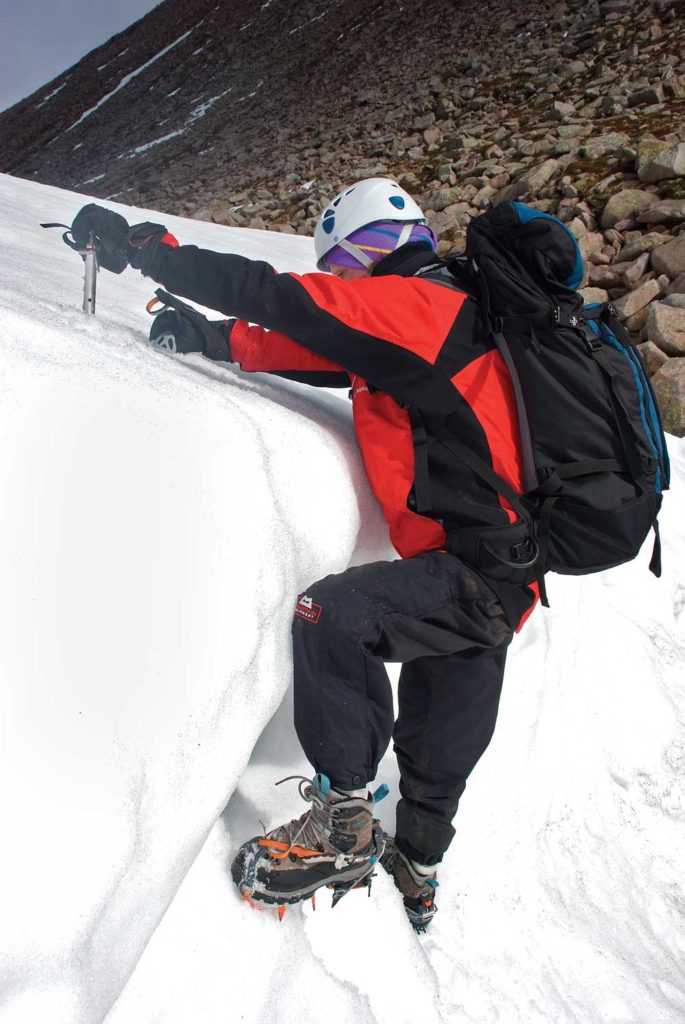
Surmounting a small cornice
Dealing with cornices
A cornice is a large cap of snow that builds out over steep slopes, particularly gullies, creating a steep, if not severely overhanging, finish to a climb. These need to be negotiated in some manner, and there are various ways to deal with them. Firstly, if the snow is very soft or the air temperature is rising, the simplest advice is to avoid them altogether. Cornices can become very unstable in these conditions and, as they will weigh a considerable amount, being underneath one when it snaps off is very dangerous. A secondary problem of cornice collapse is that it could, in slab avalanche conditions, trigger the fragile snow pack below it, causing a large area of the slope to slide. Find out about the conditions and make an informed decision before climbing hundreds of metres to find your way blocked by a very unstable and scary umbrella of snow. However, cornices can be stable and provide a challenging end to your climb, so having some method for overcoming them is a good idea.
Firstly, as they are made of snow with little or no chance of any running belays to be found, it is a good idea to have a belay stance just a short way below them, but off to one side. This will stop you from falling much distance should you fail to get over on the first try, as there won’t be much rope run out. Secondly, the sides of the cornice may provide an easier escape ramp than following the direct line up the gully would, so it would be worth investigating this possibility, deviating towards the side that appears to look the most likely route.
Failing this, you will have to go straight up. If the cornice is very small, perhaps little more than chest-high steepening or slight overhang, then you may be able to go straight over. Make sure of good foot placements, and it may be necessary to push the entire shaft of the axe into the snow to get enough purchase to progress. As you get up to the lip, reach over the top and push your axes well into the snow, away from the edge. These can be used to help work your feet up, moving the axes further back from the edge if need be. As you move your body over the final moves, take care not to lift your heels too high, otherwise the snow will be pushed in an outwards direction by your crampon points, causing them to become dislodged. Also avoid the temptation to use your knees as you top out, and step up in balance well away from any potential fracture line.
If the cornice is overhanging a little, it will be necessary to cut some of the snow away to keep your body in balance as you move up. You should be able to excavate a U-shaped slot in the snow without too much trouble, using the adze of your axe, and then climb up as described above.
If the cornice is very large, then there are a couple of options, The first will be to go down. This may seem like admitting defeat, but the time it takes to get past a very large cornice is considerable and descending, especially if night is drawing in or bad weather is on its way, is a good option. However, you may wish to continue and that will mean tunnelling through. Before doing this, be absolutely certain that by digging a hole through the snow you are not compromising its strength, and there is no chance of it snapping off whilst you are burrowing inside.
Tunnelling a cornice is a very time-consuming process, not without its dangers and with, for most people, quite a high fear factor. To be inside many tonnes of overhanging snow, chopping away at its very foundation, focuses the mind very effectively! Although tunnelling will usually just be carried out with the adze of the axe, a shovel may be available and in soft snow this will dramatically reduce the time it takes to get the job done.
You need to be able to climb through at an angle that lets you climb safely, but not at such a low angle as to have to cut through many metres of snow unnecessarily. A slope just back from vertical will be fine, and will allow you to climb in balance.
Dig away at the snow above you, letting the debris fall back down the gully and not knock you off your feet. Obviously, watch out in case there are other people below. The tunnel needs to be large enough to allow you to move with reasonable ease, and also be a size that will allow your rucksack through on your back. In very hard conditions, where digging may take some time, you may elect to remove your rucksack to save having to excavate so much snow, hauling it up on the rope later. Pull your hood up as you progress, otherwise debris from higher inside the tunnel will find its way into your clothing and soak you over time. Squirm your way up and through, using your ice tools to pull you up, and avoid the temptation to lean your back on the snow as this could cause that section of the cornice to collapse. At the top, drive your tools into the ground as far away from the hole as possible and pull yourself upright.
Words and images: Pete Hill Main image: Alun Richardson