


Noone has commented on this article yet.
Filed under:
Activities, Mountaineering, Skills & Advice, Winter skills,An emergency shelter is exactly that, designed to be used only when dire straits dictate that safety from the elements has to be sought, perhaps when your partner is injured or extremes of weather make movement impossible. Prior to making the decision to dig in, every effort should be made to get down off the hill or into some other area of safety, such as a local hut or other habitation.
Digging an emergency shelter is very tiring work, using up a lot of effort and calories. Often it will have to be constructed with the minimum of equipment, and most likely you will end up spending time in it with only the clothes that you are wearing, as it would be unlikely that you would have a sleeping bag with you on a single-day mountain trip. Anything that can be done to make the digging and construction easier should be seized on, and gear to hand such as ice axe, deadman, a plate or lunch box can be put to use for digging into the snow. A lightweight shovel will greatly simplify the digging process, and it is recommended that at least one is carried between group members during winter trips.
There are many types of emergency shelter that can be constructed. Large boulders will often have drifts of snow behind them, and these can be scooped out to create a shelter. Below the tree line, the lower branches of fir trees in particular, will often support snow but leave a sheltered area underneath by the lower section of the trunk. This can also be dug into and end up being quite spacious.
However, in a mountain environment digging into the snow may be the only realistic option. We will look at three methods here, each relevant for different situations.
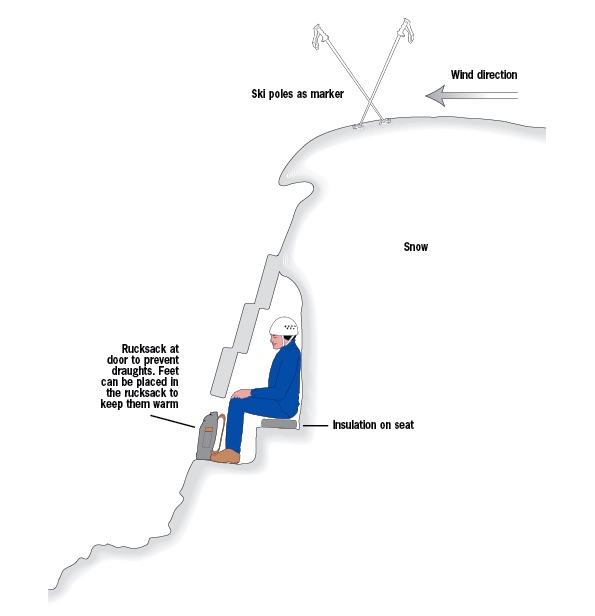
Cross section of a sitting shelter
Sitting shelter
The sitting shelter is the most thermally efficient of the three, and may be the most comfortable to spend any time in. It requires a steep bank of snow to be dug into, and these will often be found on stream banks or re-entrant features (see ‘Navigation’ section). The idea is to end up in a sitting position, with minimal contact with the snow. This position, with the entrance low down, allows warm air to be retained around the head and torso.
Digging straight into the snow and then tunnelling upwards is one way of building the shelter, but this means that you are lying on the snow all of the time and will get very wet, not a good idea if you are to spend the night in the same clothes. However, in soft snow conditions it may be the only choice. A much better option requires you to do a little more work, but it keeps you off the snow throughout, making it a more pleasant experience.
A wedge-shaped slot of around shoulder-width is cut into the snow bank, high enough to ensure that your head ends up below surface level. You will need a seat to sit on, and this can be made at the back of the slot from debris as you near the end of digging. Once the slot is dug, it will need to be roofed over in order to keep snow out and warmth in. One way of doing this is by weighing down a bivi bag or group shelter, using snow blocks around their edges, perhaps supported across the slot by walking poles. In hard or slabby snow conditions, it is much better to cut a series of snow blocks, slightly longer than the width of the slot, which can be placed over the shelter to provide a roof. These can be placed one above the other until the slot is covered, leaving only a small entry gap at the bottom. Cut them from a section of ground above the shelter, as this will make them easy to slide down into place.
The seat should be insulated with anything to hand, such as a rucksack back insert, and your feet can go into the sack itself once you are in place. Marking the top of the bivi would be a good idea, best done with walking poles or an ice axe.
Snow is a very good insulator, but you need a few centimetres (2–4in) of air gap around you. Don’t be tempted to make the bivi too big, otherwise the heat-retention of the system will not be as efficient as it otherwise might be.

The stages of building a shovel-up
A Shovel-up
On flat terrain, or where a suitably steep slope for a sitting bivi cannot be found, two other methods are possible. The first is called a shovel-up or mouse-hole bivi, and is very suitable if shovels or other methods of moving snow are available.
Place everyone’s rucksacks on the ground and, if possible, cover them with a bivi bag or shelter. Now heap as much snow as you can on top of them to create a large molehill. Gently firm the snow down with shovels and hands every now and then as you go. You can now dig a small entrance on the side out of the wind and remove the bivi bag and rucksacks. The inside can be cut out to shape to give more headroom (be careful not to dig up too far!), and then smooth the roof over to prevent it dripping.
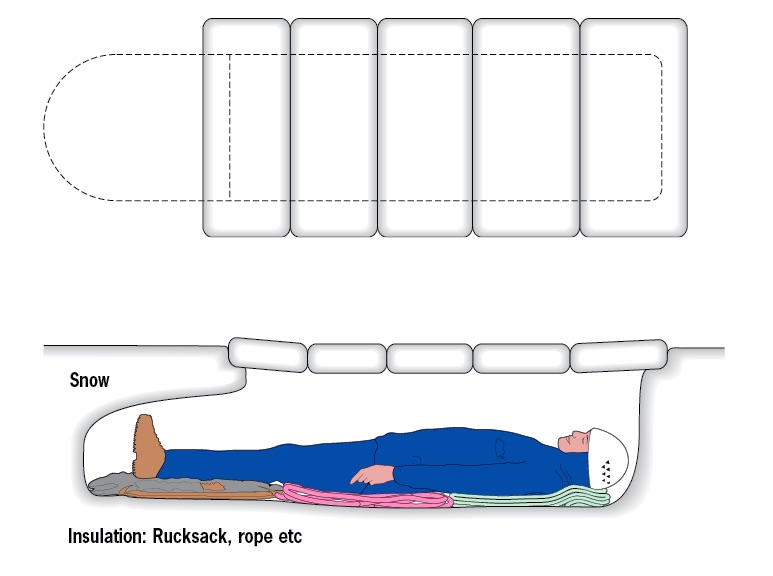
Top and side view of a snow grave
The snow grave
Another method, suitable for use on the flat in solid ground such as wind slab, is the delightfully named snow grave. This name stems from the position that you take when using it, laying on the ground under the surface of the snow.
Using the pick of your axe, cut out an outline on the ground. This should be around shoulder-width and a metre or so (39in) long. Divide this into slabs widthways and lift them out. Now scoop out the snow underneath, hollowing out an undercut section for your feet. If possible, try to leave a lip around the hole for the slabs to rest on when they are replaced. If this is not possible, other longer slabs from a position away from the hole will have to be cut. Once the hollowing out has been completed, place a couple of slabs back in place, climb inside and lower the others down on top.
Make sure that you use any spare gear to help minimize your body contact with the snow which, as you are lying flat, will be considerable.