


Noone has commented on this article yet.
Filed under:
Activities, Alpine Summer, Features Spotlight, Mountaineering, Route guidesIFMGA Guide Bruce Goodlad examines the challenges of climbing in the Alps for the first time, and suggests some routes that’ll aid the aspiring alpinist’s development…
The Alps are an amazing playground for all mountain lovers. Whether walking the classic Grand Routes like the Tour du Mont Blanc, or tackling the hardest North Faces in winter, there is a mountain adventure waiting for everyone. Many UK-based mountain-goers, however, are put off going to the Alps because they don’t know what to do, where to go and how to bridge the skills gap between what they are comfortable doing in the UK and what they might want to tackle in the Alps. In this article we are going to look at the sort of mountains in the Alps you could consider climbing, what routes might be appropriate, the skills you’ll need to learn and how to access and use Mountain Guides to help you gain the confidence to climb independently in the Alps.
ALPS VS UK
There are lots of differences between the Alps and the UK mountains, but let’s focus on a few key ones and think about how to manage them.
Scale – The scale of the mountains can take a bit of getting used to; in the UK we are used to starting and finishing at the road the same day, and even mountains that you can climb by technically difficult routes usually have an easy way off. In the Alps most peaks will require a night in a hut prior to the ascent, and the descent can often be as challenging or more challenging than the ascent. The thing that people often forget when they are making the transition to the Alps is that because the UK mountains are fairly small, if the weather is bad they just pull their hoods up and carry on. The size of alpine mountains means that this approach can put you in very difficult to access places where if you have an injury you are a long way from help or rescue. In the Alps most rescues are done by helicopter, and if they can’t fly then no one is coming to get you.
Glaciers – Travelling on glaciers is one of the many magical things that make alpine mountaineering so special. It is a long time since our home mountains were glaciated, so we need to have the techniques
and knowledge to move safely across crevassed glaciated terrain.
Altitude – The Alps are high mountains and you need to allow your body time to adjust to the attitude; if you don’t, at best you will feel lethargic, nauseous and have a headache, while in a worst-case scenario you could die. Most people will start to feel the effects of altitude between 2,500–3,000m, so it’s a good idea to climb something in the 3,500–3,800m range first, then have a night in the valley to let your body recover before climbing higher. You will enjoy the experience much more as a result.
Objective Danger – This is the hazard that is present in the mountains. The Alps are young mountains with retreating glaciers and disintegrating permafrost, and as a result they are far less stable than the old mountains we have back home. You need to be aware of these dangers and think how to manage them. A classic objective danger would be how to manage the threat of stonefall in the Grand Couloir on the Goûter Route on Mont Blanc. You need to find out what the local conditions are and decide if they are acceptable, then you can make a decision based on your observations – not what everyone else is doing. If you decide the hazard is acceptable then you need to start early so the couloir is frozen, then cross the danger area as quickly as possible.
The main objective dangers are: crevasses, seracs, stonefall and lightning. There is no getting away from it – alpine mountaineering is more hazardous than operating in the UK hills but the rewards are huge. Arriving on an alpine summit as the dawn breaks and the view across the Alps is revealed is one of the most rewarding things you will ever do in mountaineering.
FIRST STEPS
Hopefully inspired by the challenge of mountaineering in the Alps, you have booked some time off work and are now thinking about the next step; there will be new things to learn and new experiences to enjoy. There are a number of ways to approach your first few seasons: you can do what I did which was take my climbing experiences from the UK and try to directly translate them to the Alps. This can work well if you aren’t too ambitious; we were, and spent weeks trying things that were too hard for us or being in the wrong place at the wrong time. You could go with more experienced friends who have learnt from others or made the mistakes themselves; alternatively you could go on a course or hire a Guide. There isn’t the same tradition of hiring Guides in the UK as there is in mainland Europe, but I can think of no better way of shortcutting the initial learning phase of your alpine career. I wish we had done this; it would have saved a lot of wasted time and money. If you are under 25 you can book a course with the Jonathan Conville trust (www.jcmt.org.uk); they run 3–day courses in basic alpine skills which is a great way to focus on what you need to know and a great opportunity to talk to your Guide about what routes would be appropriate for your skill level and what the conditions are like on those routes at the moment.
CLIMBING WITH A GUIDE
There are many different ways to climb with a Guide, and it is important to talk to the Guide in the run-up to your trip to outline what you want to get out of your time together. As a Guide I have lots of different clients who want something different from their experiences. Many people just want to climb a specific route or be guided on a specific style of route, while others want to learn to operate independently and I have many clients who are somewhere in between; they want to learn the skills to take into their independent mountaineering, but climb something harder with me than they would be comfortable climbing themselves. The latter is a great way to develop; if you are used to moving on difficult terrain with a Guide then when you move onto easier terrain on your own you know you can do the climbing – as you have climbed on technically more difficult routes – so you can focus on the route-finding, ropework and so on. Climbing the same route again yourself that you have previously done with a Guide can be a great way of breaking through any psychological grade barrier that you may have.
Whenever I climb with a client, the trip starts months before with discussions about the type of thing the client wants from their trip, then we talk about types of route venues, learning outcomes. This leads naturally into discussions on kit and logistics so by the time we meet in the Alps we have been talking by email and phone and have a good idea about what they want to do; all we have to do now is look at the forecast and finalise a plan.
STAY FLEXIBLE
The military have a great saying: no plan survives first contact with the enemy, and the same can be said of alpine mountaineering. I was guiding on the Matterhorn once and was chatting to a colleague’s client in the hut; this was his 10th attempt but the first time he had actually set foot on the Matterhorn. On all his previous trips the weather and conditions had not been right so they had done something else. This time, on summit day the conditions were perfect – blue sky, no wind, dry rock and crispy snow – so it was worth the wait. While it is great to dream of Plan A when sitting at home with the guidebooks and maps in front of you, make sure you have some other ideas so it is not so much of a shock when the weather and conditions are not what you had hoped for.
Having flexibility in your logistics are also important; on a number of occasions I have met clients in Chamonix where the weather has been terrible, but we have jumped in the car and driven five hours to the Bernina and climbed in the sun. If we had booked hotels for the week or did not have transport we would have to make do with the conditions where we were.
CHANGING CONDITIONS
Conditions will vary through the season, so the types of route and the altitudes you may think about climbing at need to vary with that. The early part of the season (mid-June to mid-July) can be best for snow routes, while as the summer progresses the snow on the high peaks will consolidate and the rocky ridges will clear of snow bringing the higher peaks and mixed ridges into condition. As we move through the mid season (mid/late July to early September) it can become too warm for the snow faces and you need to check the conditions of snow routes as they may not freeze very well overnight. This is the prime time for climbing rock ridges, as they will be clear of snow. As we move into late season (September) conditions cool off and we can get new snow which can bring some of the snow routes back into condition.
Not every year is the same; the summer of 2014 was incredibly poor through much of he summer, with rain, snow and wind for weeks on end but September was amazing with some of the best snow and ice conditions for decades. 2015 on the other hand was dry and really hot with many of the classic routes (like the Goûter Route on Mont Blanc) being too dangerous due to stone fall. If you moved your objectives and focused on rock routes then the conditions were great.
SKILLS BLEND
One of the many great things about alpine mountaineering is the blend of skills you may use in any one day; you may leave the hut navigating in the dark, travel on a glacier then climb a rocky ridge to the summit, descend by a different route and navigate to a different hut. In a day like that you will need to be able to: 1. navigate; 2. route find; 3. rope up for glacier travel and know how to perform crevasse rescue; 4. move together protecting one another on a rock ridge. None of these things is particularly difficult or complicated, but they do require practice to do well and efficiently. If you don’t take the opportunity to look at these skills before leaving home then you make your learning curve that bit steeper.
ROUTE CHOICE
Choosing the right route for your skill level and experience is the key to success in the Alps. Spending some time with a Guide can really help shortcut this as they will be able to see your experience and ability, develop those skills during your time together, and then suggest appropriate routes for you to climb independently. If you are climbing independently from the start then play to your strengths; if you are really comfortable wearing crampons and operating on mixed terrain then think about that style of route. If you are much happier on rocky terrain and have spent very little time in crampons think more about a rocky route but one with a glacial approach so you can develop your skills. Start on smaller routes where you have plenty of time rather than jumping straight onto 4,000m peaks where you will be short on time and will probably get altitude sickness.
The 4,000ERS
Mountaineers all seem to love lists! Just like climbing Munros in Scotland or Wainwrights in the Lakes, the list of 4,000m peaks in the Alps is a pretty attractive ticklist. There are some amazing mountains on the list, many with high degrees of technical difficulty, but there are also some very accessible peaks which will give an amazing sense of achievement and a great mountain adventure. Just be aware that they are pretty popular so if you are looking for solitude and quite huts it’s best to look elsewhere.
ALPINE GRADES
The grading system used in the Alps can at first seem quite confusing. The grade given to any one route is designed to encompass the overall seriousness as well as the technical difficulty of any specific section. It will take into consideration remoteness and length as well as objective danger. Routes with technical rock or ice sections will mention these in the text; rock is graded using the UIAA system and ice gives the steepness of the steepest section.
F (facile): These routes are usually straightforward snow climbs, often on glaciers. There may be short sections of steeper snow or rock, but pitching would not be required.
PD (peu difficile): Routes with some difficulty, crevasses glaciers that may be steep, snow to 500. Ridges may have some exposed scrambling that will require protection from the rope and there may be the odd pitch of grade I/II rock.
AD (assez difficile): Expect to find snow and ice up to 550, with rock climbing to grade III with the occasional move of IV. Also expect long exposed sections on snow and rock on ridges, and because there may not be an easy way off classic AD ridges, the need to be confident on descent is also essential.
D (dificile): Snow slopes are now up to 600, with some sections even steeper. Rock climbing sections are now up to IV+ with the odd bit of V, and climbing mixed ground with ice-covered rock in crampons may be required.
TD (tres deficile): This is serious terrain, where much of the ground is hard enough that it needs to be pitched, rather than moving together and pitching shorter sections as will be sufficient on easier routes. There will be some objective danger and sustained difficulty with steep ice and rock of IV, V and even VI, with complex route finding.
ED (extremement dificile): As for TD, but more of it and harder.
The grades above can also be subdivided using a ‘+’ or ‘–’, which effectively adds grades to the system. So, for example, you would expect a grade PD+ to be quite a bit harder than a PD–.
ROUTES
So let’s have a look at some routes. Over the next few pages I’ve chosen some great routes to climb yourself or with a Guide. I have arranged them in two groups: five routes to climb with a Guide where you can push yourself a bit and learn certain skills, and five to take those skills, consolidate, and develop them yourself.
I have assumed a few things: that you have worn crampons before and have done some basic scrambling in the UK. If you haven’t had much time in crampons I would suggest spending some time on a dry glacier (bare ice, no snow cover) with your crampons practising your movement skills. The Mer de Glace in Chamonix, Ferpecle glacier above Arolla and Moiry glacier above Grimentz are all great for this. Enjoy!
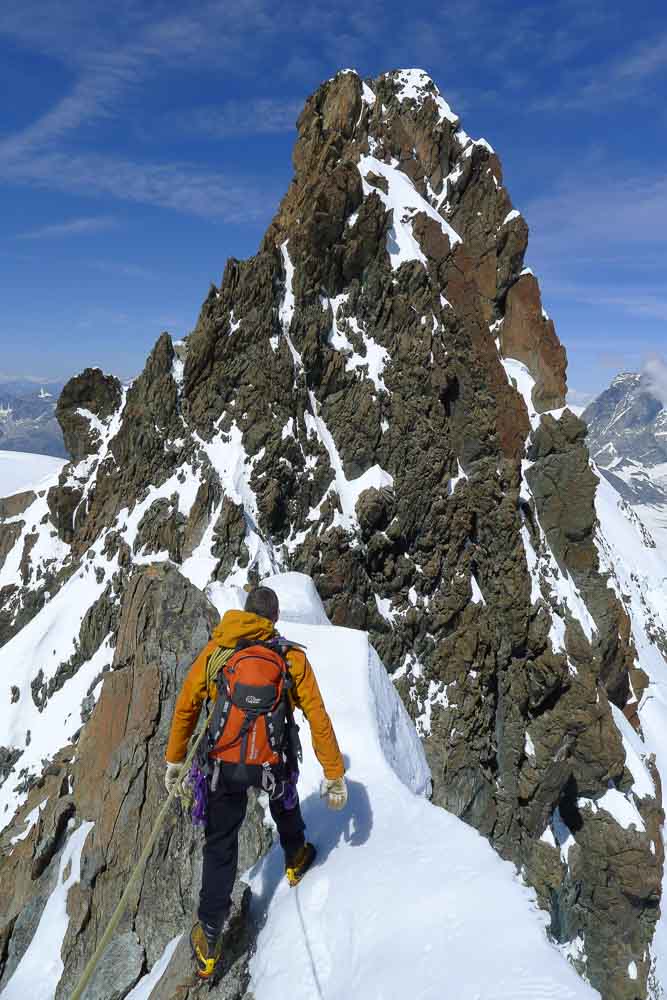
The third tower traverse of Breithorn
ROUTES WITH A GUIDE
Traverse of the Entrèves
Location: Chamonix/Courmayeur
Grade: AD–
Starting point: Helbronner lift
Skills required: Crampon skills, glacier travel and crevasse rescue, and movement on rock with one move of IV. Moving together rope work.
Gear: Glacier travel and crevasse rescue kit, small rack of rock gear for use on the traverse.
As a Guide living in the Alps this is one of my favorite day routes in the Mont Blanc massif, The route has a bit of everything: glacier travel, exposure and enough technical interest to get the juices flowing. The day begins with a ride on the new Helbronner lift which whisks you up to 3,400m, on the Italian side of the Valley Blanche, though you could also stay in the Torino hut accessed from the lift (currently under renovation). The views of the massif are amazing; to the west the Brenva face and the Peuterey ridge on Mont Blanc dominate the view, while to the east side there’s the stunning granite tooth of the Dent du Geant.
You can walk straight out of the lift down some steps onto the snow; this is where you put on your crampons and rope up for glacier travel. The route takes you over the Col du Flambeau then round the base of the Aiguille du Toule; then climb the crevassed glacier to the Col d’Entrèves between the Entrèves and the Tour Ronde. Transition here from glacier mode to rock mode; crampons off, helmet on, shorten the rope and get your rock gear out.
The ridge starts with some easy scrambling then gets progressively narrower and more exposed. Most of the time you can use rock spikes on the ridge and there is the odd bolt where you want them. Beyond the summit some downclimbing that can be abseiled leads to a col, the ridge then leads over some smaller tops before a steep downclimb leads back to the glacier. It can often be very icy traversing round a rock buttress to reach a snow ridge and then the glacier, so it might be worth using an ice screw for protection here. Join your up track and follow it back to the lift.
Mont Blanc de Cheilon
Location: Arolla
Grade: PD+
Starting point: Cabane de Dix
Skills required: Crampon skills, glacier travel and crevasse rescue, movement on rock, moving together ropework.
Gear: Glacial travel and crevasse rescue kit, small rock rack.
Mont Blanc de Cheilon dominates the view from the Dix hut; it is a stunning climb with movement on glacier, snow and rock. It is a great route to blend and develop your skills under the coaching of a Guide. The route starts with some glacier travel; this can become bare ice later in the season so you wouldn’t need a rope as you will be able to see any of the crevasses. The glacier leads to the col du Cheillon and above this stretches a rock ridge. The easiest way on is via some scrappy ground on the right; once on the ridge the rock is solid. The scrambling is easy and the perfect place to get out in front, weaving the rope round spikes while being coached as you go. At the top of the rock it’s crampons back on and into glacier travel mode to reach a col on the SE ridge. The ridge narrows quickly and is usually a mix of rock and snow so you will probably keep your crampons on. The last section to the summit is quite steep so you may make a few short pitches. The descent is back down the same way to the col, then you either retrace your steps or descend the Upper Gietro glacier. In good snow the glacier can be a lot quicker than descending the rock but there are some pretty big crevasses to negotiate before heading northeast over the Col de Cheilon and back to the hut.
Other routes in the area that link up:
Pigne d’Arolla (F): A great link up is to go to the Vignettes hut then Traverse the Pigne d’Arolla to the Dix hut, spend the night, climb Mont Blanc de Cheilon, stay a second night in the hut then climb La Luette the following morning or the rock climb that sits between the Pas du Chevre and the Col du Reidmatten.
Pollux
Location: Zermatt or the Val d’Ayas – it is possible to approach from either
Grade: PD+
Starting point: Ayas hut or the Klein Matterhorn lift
Skills required: Glacier travel and crevasse rescue, rock scrambling and belay techniques.
Gear: Glacier travel kit and a few extenders and slings for the fixed ropes. There are lots of spikes to protect the rock sections.
Pollux is a fantastic peak in the middle of some of the most impressive high mountain scenery in the Alps. If you are fast it is possible to climb it out and back in a day from Zermatt’s Klein Matterhorn lift, though you do need to be moving well. Alternatively you can combine this with an ascent of the Briethorn, either climbing the classic route and descending to the Ayas hut then climbing Pollox on the way back the following day; or, if you want a more difficult adventure, then climb Pollox on the way to the hut then climb the half traverse of the Breithorn (AD) on the way back. It is possible to get to the Ayas hut from the Val d’Ayas. Park in St Jacques at the head of the valley then either walk or get a 4×4 taxis to the end of the track. The bar in the village organises this.
Either approach takes you through some fantastic glacial scenery to land you at the bottom of the SW ridge; depending on the snow conditions you can sometimes bypass the lower rock ridge by climbing some steep snow. If conditions are dry, scramble up off the snow then take your crampons off. Great scrambling leads up the crest of the ridge, always following the best rock to a steepening where you will find some fixed ropes. This is a bit of an oddity that you will only find on a few routes in the Alps, where local guides put fixed ropes in place to make an ascent easier for their clients. There are two sets here; the right hand set look more difficult but are easier. Above the fixed ropes it’s crampons back on and a beautiful snow crest to the summit. It can be quite busy on the fixed ropes as many guides use the route as Matterhorn training, so be patient but firm so you don’t get climbed over.
Piz Bernina
Location: Pontressina
Grade: PD+
Starting point: Diavolezza lift
Skills required: Glacier travel and crevasse rescue, rock scrambling and belay techniques.
Gear: Glacier travel kit and a small rack.
The Piz Bernina is the most easterly 4,000m peak; its most famous feature is the Biancograt a 1,200m ridge encompassing the perfect blend of movement on rock, snow and ice. To my mind it is one of the best mountaineering routes in the Alps, but that length at AD is a big jump up for most people so what I am going to suggest is an alternative that gives an incredible alpine experience on extremely varied terrain.
Our journey starts at the hut at the top of the Diavolezza lift. In the morning, drop down onto the Vadret Pers then climb up to the start of the Fortezza Ridge. The ridge gives a great blend of short pitches and moving together on good rock with plenty of bolts and pegs to aid progress. It is also equipped for descent but is more challenging in this direction. From the top of the ridge, traverse the Bella Vista terraces (a glacial shelf) to the Marco Rosa hut, at 3,600m one of the highest huts in the Alps. You should make it to the hut by mid-morning, so after a quick brew you can head out and climb the Spallagrat, the classic route on the Bernina. This is a combination of rock and mixed ground; belays are in place but you will want a small rack. The view from the summit is incredible, with the mighty Piz Roseg in the foreground and western alps on he horizon. Descent is back down the way you came, you can abseil over all the steep sections.
After a night in the hut, the best way back to Diavolezza is to traverse the Piz Palu; start by recrossing the Bella Vista Terraces to the Fourcla Belavista then follow the superb solid rock ridge onto the Piz Palu. At some point the rock gives way to snow where you will need crampons, the ridge then carries on as a series of magnificent snow crests before a heavily crevassed descent leads back to the hut.
Traverse of Breithorn
Location: Zermatt or Val d’Ayas
Grade: AD
Starting point: Klein Matterhorn or Ayas hut
Skills required: Crevasse rescue, movement on steep snow/ice, movement on exposed rock, moving together and pitching.
Gear: Glacier travel, crevasse rescue and small rock rack.
The route I am going to suggest is actually the half traverse; the full traverse is more serious and has some awkward poor rock approaching a key abseil, whereas the half traverse is one of the best routes of its grade in the Alps. At AD it is a bit of a step up in grade and, while it is exposed, the rock is good and the holds plentiful and is a great introduction to AD terrain. The route can be climbed in a day from the first Klein Matterhorn lift or from the Ayas hut, a great combination is to combine it with Pollox as described above.
To gain the ridge you must first cross a bergschrund and climb some steep snow; if there are good footsteps you may move together but if the slope is icy you may have to make a few pitches. Even if the ridge looks pretty clear of snow it is often worth keeping the crampons on until you are past the first tower; you turn this on the left by crossing a snowy gully which can often hold snow and ice late into the season. Once past this section the route is more or less on the crest, crossing some incredible terrain, if you get a bit lost just look for the crampon scratches. There is some fixed equipment but not as much as you would expect on a classic Swiss route of this grade, so you will need to place your own protection.
The rock section ends on a small platform where you can put your crampons back on before crossing the spectacular corniced snow crest of Briethorn Central then another narrow snow crest over Breithorn west before an easy descent to the Klein Matterhorn lift.
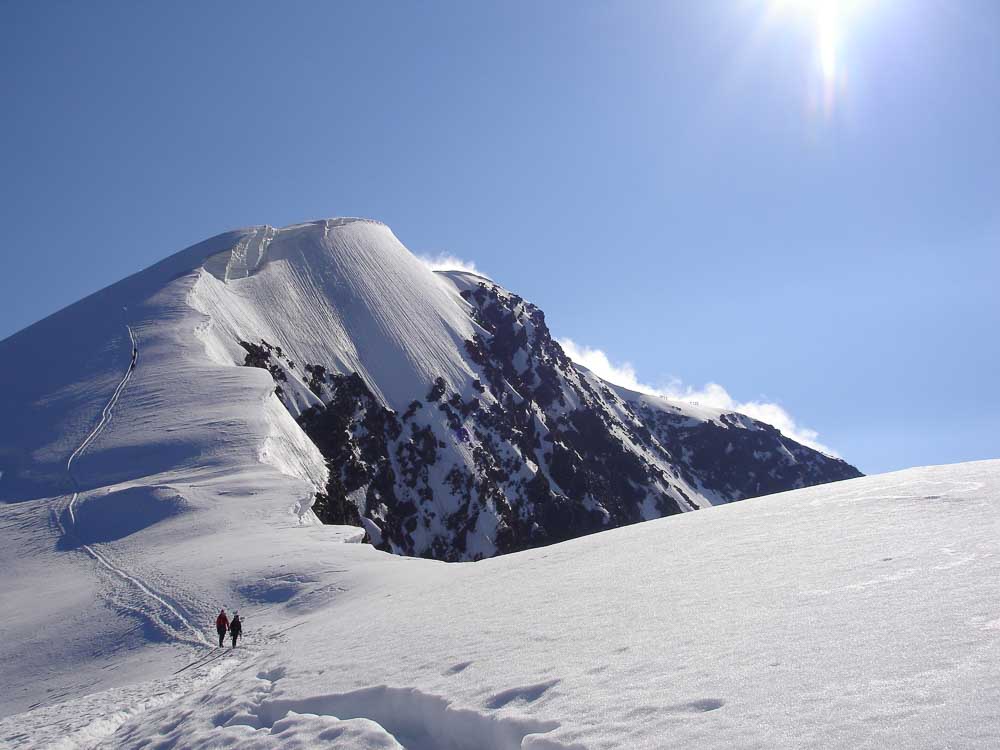
Descending the north side of Weismies
INDEPENDENT ROUTES
Traverse of Pigne d’Arolla
Grade: F
Location: Arolla
Starting point: Dix or Vignettes hut
Skills required: Glacier travel and crevasse rescue
Gear: Glacier travel and crevasse rescue.
The Pigne d’Arolla is conveniently situated between two huts: the Dix and the slightly higher Vignettes hut. The grade is the same in either direction and the route is equally as enjoyable. My preference would be to traverse from the Vignettes hut then stay in the Dix hut on the way down which gives
the opportunity for another mountain the next day. The hut walk is stunning, starting in the forest then moving through all the vegetation zones to finish on a glacier as you approach the hut. The Vignettes hut is one of the most spectacular in the Alps with incredible views; it also has one of the best hut breakfasts in the Alps. The ascent is on a crevassed glacier with a short broad ridge to take you to the summit. The summit gives you one of the finest panoramas in the Alps with the Mont Blanc Massif to the west, the Bernese Oberland to the north and Valais stretching towards the Piz Bernina in the east.
The descent to the Dix is down more glaciated terrain, a bit steeper than the ascent, and there is a steeper section just below the Col Serpantine that can be a bit icy (the hut guardian will be able to advise). At the Dix hut you can relax and plan the next day’s adventure. One option would be to climb La Luette, a lovely peak close to the hut with a glacial approach and an easy rock ridge to the summit. You can then swing back past the hut for a drink before heading over the Pas d’Chevre via a series of steep ladders then down to Arolla. An alternative if you fancy some rock, is to traverse the ridge between the Pas d’Chevre and the Col du Reidmatten; this will require four quickdraws but not other kit and is a great climb on solid rock with an abseil thrown in.
Traverse of Weissmies
Location: Saas Grund
Grade: PD
Starting point: Allmageller hut
Skills required: Scrambling on rock, moving together on rock ropework, glacier travel and crevasse rescue, crampon skills.
Gear: Glacier travel kit, standard alpine kit plus a helmet.
The traverse of the Weissmies is, in my view, the best route at its grade on a 4,000m peak – or maybe even at all. It has everything: a great hut, good scrambling on rock, a snow crest with a stunning summit view. The descent is in total contrast to the ascent, being on impressive glacial scenery descending to a high lift at Hohsaas (3,100m), which means that your knees are saved on the way down. The approach is from Saas Almagell up a good track, initially pretty steep but then ascending a beautiful hanging valley; there is even a hut just over half way in the Almagellar Alp where you can stop for a break.
The ascent itself starts with a walk to the Zwischbergenpass, then you ascend some snow on the east side before joining the rock ridge. The scrambling is great on solid rock with great views. The angle suddenly eases, then a spectacular snow crest leads to the summit. The descent down the heavily glaciated north side has an amazingly different feel and moves through some big crevasses and under a serac, so it is not a place to linger. Some final crevasse weaving leads to the Hoshaas lift and quick descent to the valley. If you are still feeling adventurous, you can rent an offroad scooter (Monster Trotty) at the mid station and descend to the valley in style. The lift will take you bag down for you.
Gran Paradiso
Location: Val Savaranche
Grade: F+
Starting point: Vittorio Emanuelle or Chabod huts
Skills required: Glacier travel, crevasse rescue, crampon skills, rock scrambling basic moving together on rock.
Gear: Glacier travel, crevasse rescue and 3 quick draws for the rock.
The highest mountain in Italy has to be on anyone’s list of mountains to climb. At just over 4,000m it can be a great introduction
to the higher peaks of the Alps. The mountain is serviced by two huts – the Chabod and the Vittorio Emanuelle – and the climb is equally as enjoyable from either. The route from the Chabod is a bit shorter as the hut is higher, but the glacier is more crevassed than the route from the Vittorio Emanuelle.
The two routes join just below the Col du Becca di Moncorva then climb together to the final rock ridge. The rock section is short but it is very exposed and can be the scene of considerable congestion, so I would suggest avoiding it in August when the Italian holidays are on unless you want to have an uniquely Italian high mountain experience. Think of a Milan traffic jam at 4,000m and you will get the picture. The rest of the year it isn’t too busy. On the rock there are some bolts, so you can shorten the rope between you and clip the rope into the bolts as you move.
A really nice trip is to ascent from one hut then descend via the other, making a traverse. It is really easy to hitch along the road and pick up the car.
Traverse of Crochues
Location: Chamonix
Grade: PD+
Starting point: Index lift
Skills required: Easy rock climbing and moving together
Gear: Small rock rack and helmet; you might need an ice axe early in the season.
Climbers coming from the UK are generally pretty poor at moving together. Most crags and mountains in the UK are of a scale that allows them to be pitched, but the Alps are bigger and an ability to move together efficiently and safely is a skill worth taking the time to learn and practise. The traverse of the Crochues is the perfect route for this, being long enough to entertain but short enough that there is no real time pressure.
The approach from the lift takes about an hour. Early in the season there can often be snow in the gully so it would be worth having an ice axe with you. Once on the ridge the first pitch is a chimney groove of grade IV; this is best pitched, but after that the rest of the route is a mix of short pitches and moving together with a short abseil/downclimb. Route finding is pretty easy, and the descent passed the Lac Blanc hut allows for some refreshment. The descent is much faster and easier on the knees early in the season when there is still snow. It becomes a bit of a rubble fest once the snow goes.
North Ridge of Pigne de La Lé and Pointe du Mourti
Location: Grimentz
Grade: F and PD
Starting point: Cabane du Moiry
Skills required: Easy scrambling, moving together, glacier travel and crevasse rescue.
Gear: Glacier travel, helmet, a few extra slings might be worth taking.
I reckon the area round the Moiry Hut is one of the best places you can cut your teeth as an independent alpinist. The hut approach is short and all on foot, so the area has a purity to its alpinism. You can approach the hut either by walking up the path or by ascending the Moiry Glacier; this is usually dry in summer so is a great place to practise your crampon skills.
The North Ridge on the Pigne de La Lé is a great short route that can be climbed in most conditions. You can often sneak it in given a short period of good weather; if visibility is poor it is easy to come back down if you don’t fancy navigating on the glacier. In good weather the views are amazing and the route is a great place to develop your moving together. The descent is on a glacier so you can work on these skills as well.
The Pointe du Morti is the perfect follow-on, being longer, a bit more difficult and higher. The initial approach is the same, then you strike out across a crevassed glacier. You need to pay attention as the crevasses run parallel to the track, which is more difficult to manage than crevasses running at right angles. The glacier steepens, then you climb off the snow onto a rocky ridge where blocky scrambling leads upwards with great views all round. At the top of the rock it is back onto snow initially, on a broad ridge that narrows to the summit.
The descent is back the way you came or, if you are ready for the next step up in grade, the traverse to the Dent des Rosses is a fantastic AD.
The Author:
Bruce Goodlad is an IFMGA Mountain Guide living and working in the Alps. In addition to his work as a Guide, he is the Technical Director of the British Mountain Guides and author of two books, ‘Alpine Mountaineering’ and ‘Ski Touring’. Both books are aimed at taking folk from their first steps in the mountains through to independent mountaineering and skiing. ‘Alpine Mountaineering’ has just been revised with the latest route information, and is available direct from Pesda Press or from bookstores and outdoor retailers. Bruce is sponsored by Haglöfs clothing and equipment (www.haglofs.com). Find out more about Bruce at www.mountainadventurecompany.com
Feeling peaky?
BMC Travel insurance comes with £10 million emergency medical cover: Knock yourself out.
After Alpine & Ski insurance? We’ve got a great deal to keep you covered: 25% off all annual multi-trip policies in Europe, which works out at £141 for 12-months cover.

Years of experience
We’ve been insuring adventurers like you for over 30 years. That’s why all of our policies come with:
- 24-hour emergency assistance helpline
- £10 million emergency medical cover
- £100,000 search, rescue and recovery cover
- £10,000 personal accident cover
- £5,000 cancellation cover
- £2,500 baggage cover
- No age loading until you’re 70
WATCH: BMC Insurance: built for the mountains
Want to know more? READ: 5 reasons why you need BMC Travel Insurance
*Policy details: £141.80 for annual European Alpine and Ski cover up to age 69. For policies purchased between 14 May and 31 August 2018.