


Noone has commented on this article yet.
Filed under:
All Skills, Avalanche Awareness, Ice & Mixed Climbing, Mountaineering, Ski Touring, Ski Touring 2019, Skills & Advice,There are a number of tests that can be done to assess the state of the snow. None of these should be taken in isolation, but used to help build up a picture of what the snow conditions in that immediate area are likely to be. All should be carried out in a safe area, at the same height, altitude and aspect of the slope to be crossed or climbed. When you have moved on any distance the conditions will have changed, so it is important to build up a picture by performing a number of similar tests as your day unfolds.
The squeeze test
Making a ball of snow in your hand allows you to make a quick assessment of the temperature of the outer surface of the snowpack, useful when deciding what state the underlying snow may be in. If the snow falls apart when you open your hand up, this shows that the temperature on the surface is below freezing. If you can easily make a snowball, the temperature is probably just above freezing. If you squeeze and can make water come out, then the temperature is relatively high.
Snow below freezing may be unconsolidated, leading to a powder avalanche risk if there is sufficient build-up. Conversely, wet snow will create a problem as the moisture could percolate through the snowpack, run downhill on a harder, buried layer or the surface of the ground, and cause a wet slab avalanche.
Snow pit analysis
Dig a pit into the ground and make the back wall vertical. The depth of the pit will largely depend on whether a shovel is available, but try to cut down to a hard layer that has been made solid by a melt/freeze process. Inspect the back wall for signs of different layers, and assess the change in hardness between them. Using a scale of 1 to 5 is useful, where 1 is a fist, 2 is gloved fingers, 3 is a single finger, 4 is an axe spike and 5 is an axe pick. What you are looking for here is a difference of more than 2 between adjacent layers. For instance, if a very soft layer that your fist penetrates, giving a 1, is sitting on a hard layer that only accepts your axe pick, 5, you have a large difference and the chance that the layers may not be strongly bonded together.
Also look out for layers that appear inconsistent with the others. In particular, layers of ice crystals or round pellets, loose grains of ice or air gaps all show a high degree of instability and will give an almost total lack of cohesion between adjacent layers.
Each layer could also benefit from the squeeze test, mentioned above. This will determine if there is any significant moisture in the snowpack, once again causing possible instability
The walking shear test
If you have decided that there may be some instability within the snow, you can check a section for cohesion by performing this test. It is made far easier if a shovel or two are to hand, as a reasonable amount of snow will have to be excavated. It should be sited in a safe position where you will not be threatened by the snow above, and on a slope of around 30 degrees.

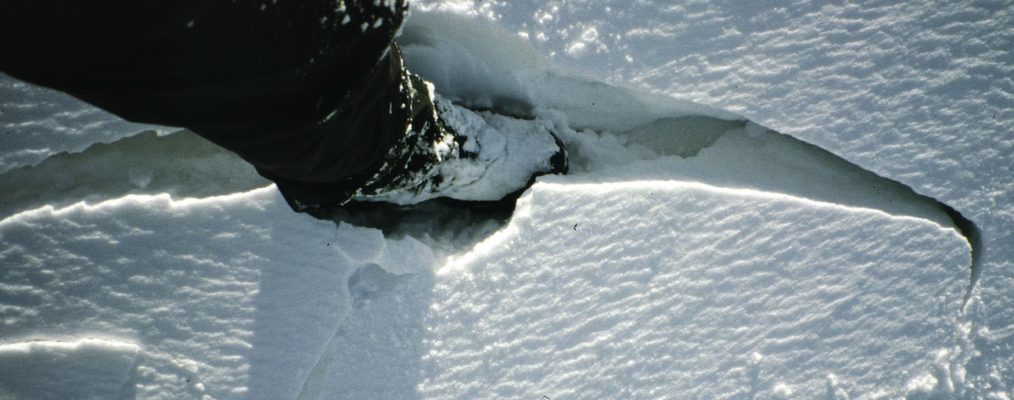
LEFT: Block being excavated MIDDLE: This block slide out once isolated on the up-slope side RIGHT: It also split into three sections, showing smooth shear planes throughout
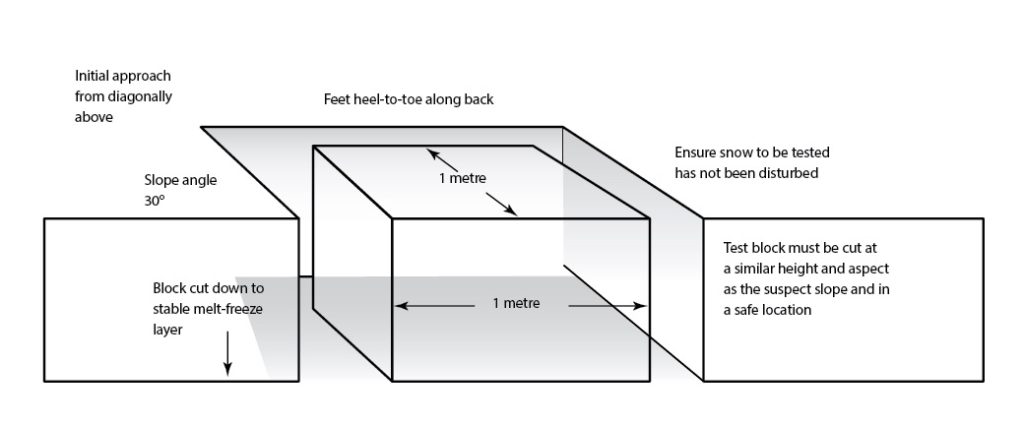
The walking shear test
Dig out the sides and lower face of a block measuring a metre by a metre, with its depth going down to just below a solid melt/freeze layer, taking care to not disturb it whilst doing so. Now very carefully cut through the upslope edge, completely isolating the block on all four sides. It is now subjected to a series of tests, running from 1 through to 7. 1 is where the block fails, which means that it slides on a layer below surface level. 2 is when it fails as you approach the block from above, and debris that you dislodge causes it to slide. 3 is when it fails as you stand up carefully, heel to toe, along the back edge. 4 is failure as you do a quick down-sink using your knees. 5 is where it goes after a small jump, 6 is failure after a few jumps, 7 is no failure at all.
If the block slides at anything from 1 to 4 then you need to be very cautious how you proceed, as there are unstable, non-cohesive layers within the snow pack. Even if it does not fail at the test site, this does not mean that the slope will be safe a little farther on or higher up. Check the state of the shear layer as well. If it is smooth then that further confirms that the layers are not cohesive, if it is jagged and uneven then cohesion is taking place.
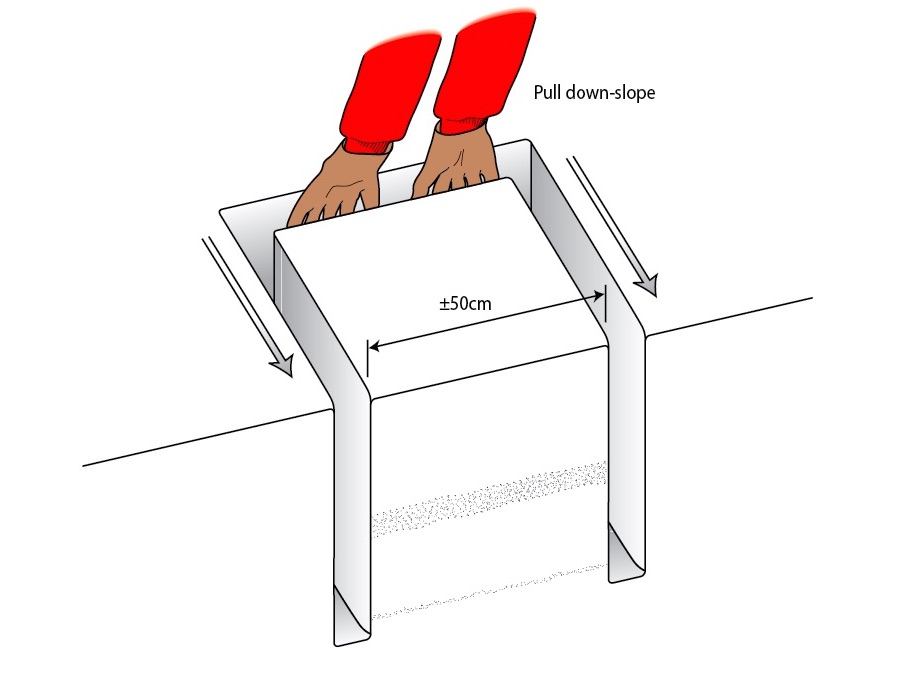
The hasty pit
This is a small version of the walking shear test, with the advantage that it can be constructed easily with just an axe and the test carried out very quickly, hence the name. It does, however, only tell you what is happening in the layers near to the surface, and you may miss instabilities deeper down.

Pulling diwn-slope to test a hasty pit
Isolate a block 30–40cm (12–16in) in the same manner as for the larger test, cutting away the sides and downslope face. This should be done down to just below the layer that has given you cause for concern, perhaps a hard or soft layer detected when you pushed your axe shaft into the snow. Now carefully isolate the block on the upslope side by using your axe pick, taking care not to disturb it, and widen this slot so that you can place your hands in it. With your fingers outstretched, put both of your hands down the back of the block and slowly pull, don’t lever, down-slope. You are finding out how much effort it takes to make the block move. If it slides off as you isolate it, that indicates severe instability between the adjacent layers. If it slides when you touch it with your hands, or with a slight downslope pressure, that too shows that a sliding hazard exists. Even if it fails with a harder pull, or seems to disintegrate, indicating cohesion between the layers, this again does not guarantee that the rest of the snowpack will be consolidated.
The hasty pit
As you will probably be performing a number of these tests throughout your journey, make sure that the size of the block is constant each time, otherwise you will be getting a different feel for the snow at each stop, leading to a variation in conclusions.