


Shop-bought dehydrated meals are expensive and don’t always taste that great – but what’s involved in making your own? Amanda Travis advises on what you need to get started and what mistakes to avoid making…
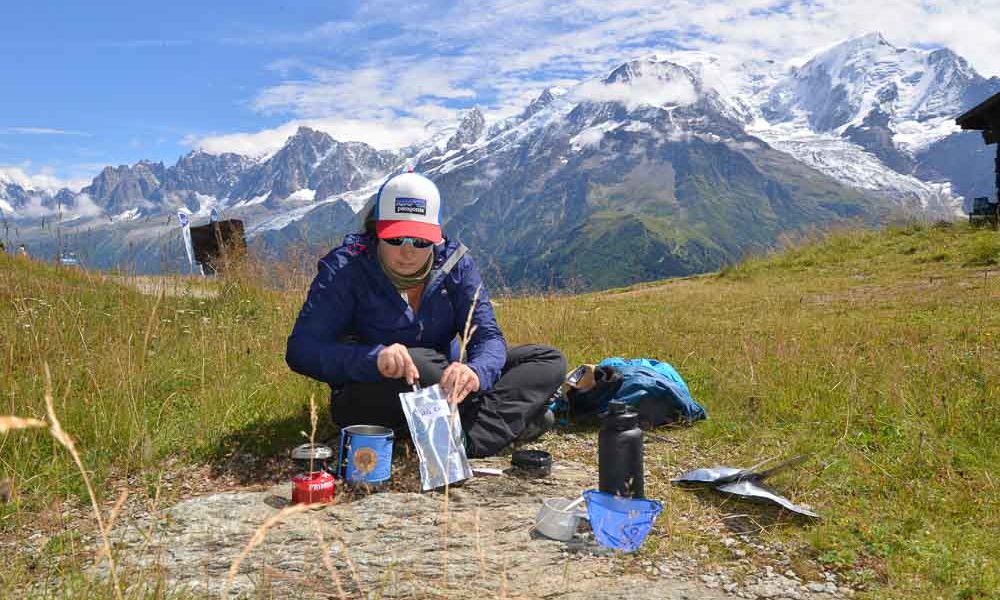
You’re preparing for a multi-day excursion into the mountains and you’ve minimised the weight of your ‘big three’ (tent, sleeping bag, mat), checked the weather and packed the appropriate clothing, chosen a lightweight stove and compact cookware. You try on your pack and it feels great – that is, until you add a week-long supply of food! Sure, we can go out and buy a selection of our favourite freeze-dried meals – however, the cost of these meals can add up very quickly, and for those with dietary restrictions, those who want something a little more creative and closer to that of a home-cooked meal, or (like most of us) those simply looking to save a few quid, dehydrating our own meals can be a great solution.
EQUIPMENT
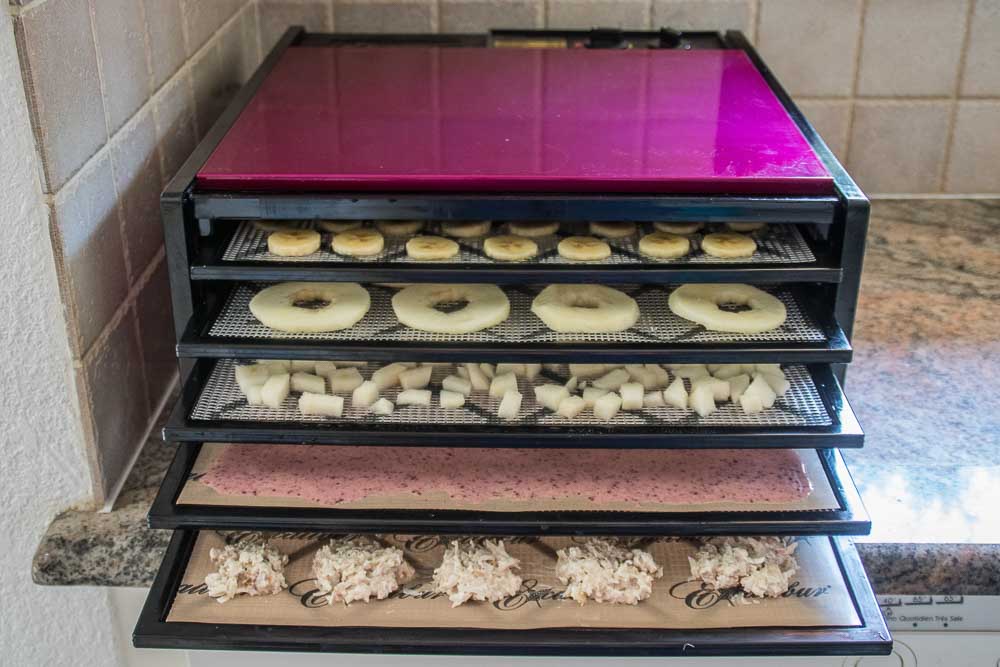
I’ve pondered the idea of food dehydration for several years now, and a few months ago I finally decided to buy a good quality food dehydrator. I went with the Excalibur 5-Tray model for several reasons. This was not the first dehydrator that I’ve purchased; I’d previously bought the circular stacking kind. The shape (with a hole in the middle) made drying out wet meals, such as chilli or curry, nearly impossible, and the lack of temperature controls and the heat not reaching the top trays resulted in a mouldy, inedible mess – it did, however, work just fine for dehydrating fruit chips. The Excalibur that I purchased has square trays for which I also purchased the optional Excalibur ParaFlexx Premium Sheets, making spreading out wet food super easy. It has temperature controls and a timer, and a fan that blows air from the back (rather than from the bottom as with the stacking variety) for more even drying. The 5-Tray dehydrator is fairly big, and those with a small house/flat might prefer the 4-Tray, but the 5-Tray holds twice as much as the smaller 4-Tray model and I managed to find it on sale for just under £200 (although the sale unit was pink in colour which my partner was not overly thrilled about!).
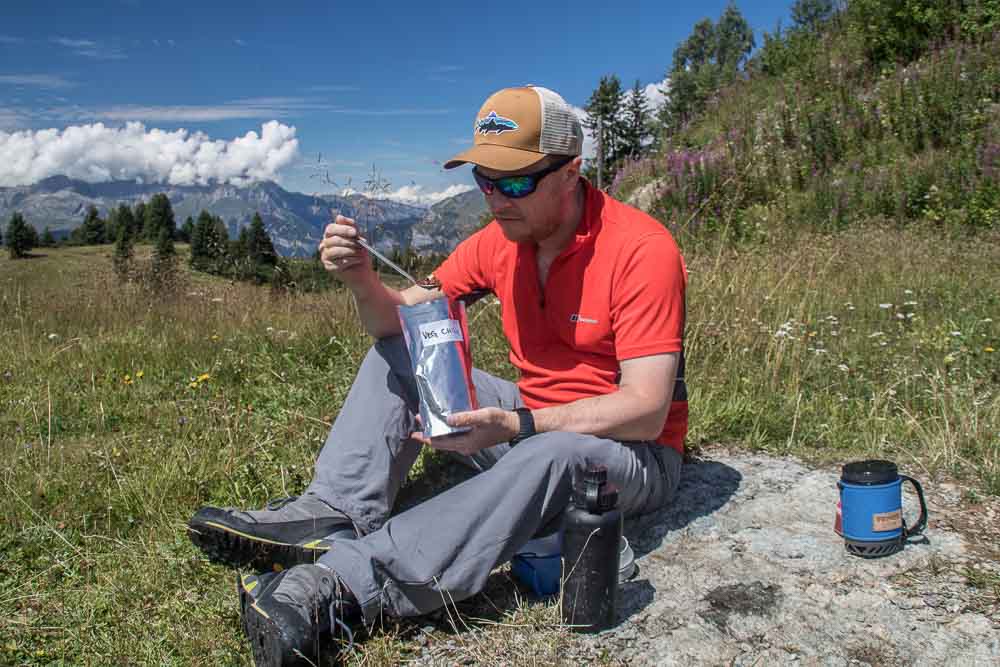
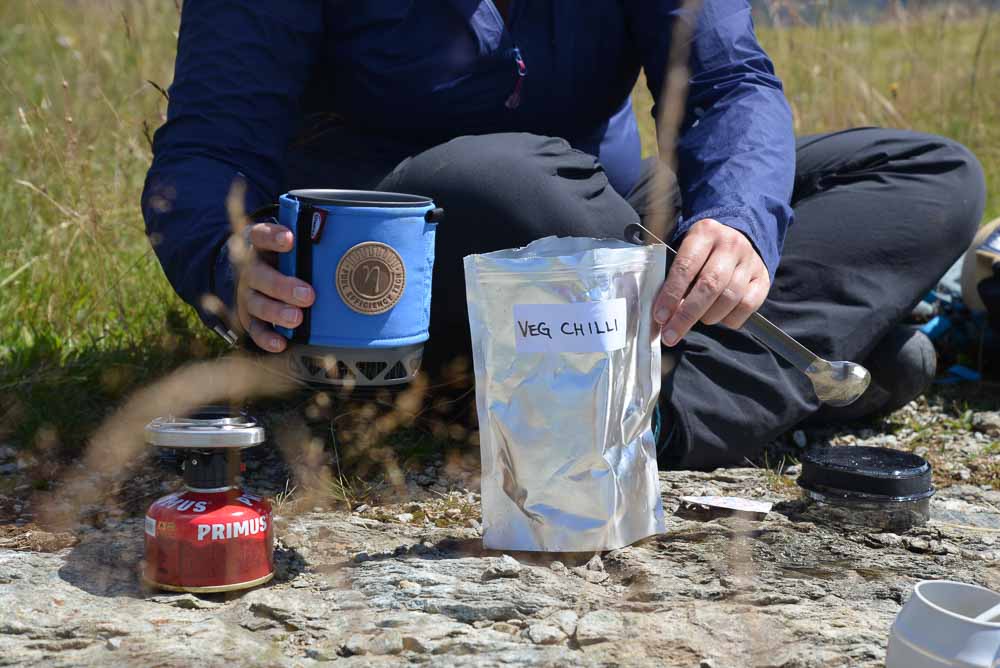
 The next consideration is food storage. I’ve spoken to many people who like to carry their dehydrated meals in Ziploc bags, placing the bags in a home-made reflective pouch to rehydrate, but I went for more traditional freestanding Mylar zippered bags. These bags are food-grade and the cooking happens right in the bag, plus the food keeps longer as they also block out light. Because you can eat straight from the bag, you also avoid any messy clean-up. This seemed an obvious solution, being that a package of 50 cost about £10. Though there are heating devices sold for sealing the bags, I found this to be an unnecessary purchase as a clothing iron seals the bags well. The bags that I found have a tear notch for easy opening – a small consideration, but I appreciated this on the trail. I also bought some oxygen absorbers for meals that I didn’t plan on eating right away, and printable labels for keeping track of what was in each bag.
LEARNING CURVE
That’s the easy part… learning what you can and can’t dehydrate was more complicated. The Excalibur came with a user manual, as well as a dehydrating guide, and these were useful and great for home use, but not at all specific to creating meals suitable for rehydrating in the outdoors – aside from one small chapter – which meant that I had to turn to the internet to do more research. While many sites offered tips and advice, and even the odd recipe, I had a hard time finding one that really pulled it all together and was geared towards those looking for an easy, lightweight meal (ie – just add water).
To make the meal suitable for most hiking/trekking or mountaineering objectives, the finished meal must: require no assembly or carrying of additional ingredients, rehydrate simply by adding boiling water (to conserve gas thus keeping the weight down), taste good, and offer enough nutrition to keep you charged up on the mountain. While it may seem simple to take your favourite highly calorific home-cooked meal, spread it out on the drying sheets and start the dehydrator, I quickly learned that there is quite a bit more to it than that, and that a little knowledge gained beforehand can save a lot of time and spoilt ingredients.
 GETTING STARTED
Before getting started there are some basics that are important to know.
1. Fatty foods do not dehydrate well and can spoil. This includes butter, oil, cheese, milk (and save the avocado for after your hike!). This was the first hard lesson that I learned, and with it went my hopes for creamy mushroom pasta, macaroni cheese, and all the other creamy delicacies that I had dreamt up (although, you could add store-bought powdered milk or powdered cheese to your recipes).
2. Not all foods dry equally (having different optimal temperatures and drying times). As much as I’d love to tell you just to throw all of your leftovers in the dehydrator without a second thought, I’d be lying if I said that I didn’t have better results by drying some parts of the meal separately. Though some foods, such as chilli and pasta sauce, seem to fare well when dried out as an entire meal, in the instance of curry, for example, I found it better to dry out the veg individually and the sauce separately and even taking it a step further and blitzing the sauce into a fine powder so that it takes up even less space.
3. Meat needs to be cut into small pieces. Meat such as chicken can be difficult to rehydrate, so cutting it into very small pieces is best. This can get a little messy when dissecting the meal after it’s been cooked. Minced beef seems to do well, and so I tend to do more meat dishes which use minced beef, such as bolognaise sauce or chilli con carne, and keep other dishes, such as curry, vegetarian.
4. Strong smelling foods will make your house smell. That’s right, you may want to wait until your flatmates have left for the day to dry out your garlic and onions, or anything else for that matter, as the process definitely allows the smell of whatever food you’re preparing to waft through your apartment for the entire time that it’s drying, which could be 12 hours or longer.
5. Flavours can transfer.
I first noticed this when I dried curry and spaghetti bolognaise together. Although they were both still good enough to eat, something tasted ‘off’ in the first bite or two. In the next batch when I dried them separately, they were perfectly fine. Drying similar foods together can help prevent flavours from transferring.
6. It’s best to test a recipe at home rather than high up the mountain. Once you get the hang of dehydrating meals, this step won’t be as necessary, but while learning I found it helpful to test out the first few meals at home (which meant eating dehydrated meals for dinner for a few days!). The meals all turned out well, but I made the mistake of adding too much water when rehydrating. I had read that you should weigh the meal when it’s wet, then again when dried, and add the difference in water when rehydrating. This seemed logical; however, when I tested this theory, I found it to result in adding too much water, and now I just add enough water to cover the contents, adding more if necessary (it’s easier to add water than to remove it!). I’d love to hear if anyone has mastered a way to accurately calculate this, but for now this is what I’m sticking with.
7. Some foods need to be prepped. Some vegetables need to be blanched before drying to later use in cooking. But for our trail foods, we’ll be cooking most of the vegetables anyway, so for our purposes pre-treating is more important when it comes to light-coloured fruits, such as apples and bananas, which I tend to dip into a lemon juice (or sometimes lime or pineapple juice) and water mixture (1 cup of juice into 1 litre of water) before drying to prevent them from darkening too much during the drying process. This can add taste, so another option is to use ascorbic acid (vitamin C).
8. Slice evenly. This one goes without saying – the more evenly sliced your fruit, veg or meat, the more evenly it will dry.
 MEAL PLANNING
Oatmeal tends to be my preferred breakfast food on the trail, and because of this breakfast was the easiest meal for me, using instant oats as a base, adding some powdered milk, dehydrated fruit, and adding a bit of flavour such as brown sugar, maple sugar, cinnamon, or whatever else I could come up with! All of these items can be tossed into a bag in which you can just add boiling water. If you prefer, you can use a simple Ziploc bag and cook it right in your cup or bowl, as the oats cook much quicker than the other meals which do better in a reflective pouch.
Dehydrating fruits such as apples and pears was easy; dehydrating berries such as blueberries took a little more getting used to, and required some preparation beforehand – submerging in boiling water then an ice bath to crack the skins. Foraging for berries along the trail (as long as you know how to tell the difference between edible and poisonous varieties) is another great way to spruce up your oats. I haven’t really branched out beyond this for breakfast yet, so for the sake of this article, I’ve focused more on the larger meals of the day, though I certainly intend to try other recipes such as dehydrated scrambled eggs and even baked beans.
Choosing a base
When first getting started, I found it easiest to develop each meal around a base of pasta, rice, couscous, or potatoes – although, I’m sure there are many other suitable options. Couscous is by far the simplest as it requires no preparation and does not need to be cooked or dehydrated beforehand. You can simply add it to the bag with your other dried ingredients and let it cook on the trail, simply by adding water. Couscous can actually be prepared using cold water, so depending on your other ingredients you may not even need to boil the water. I found that some Moroccan spices, a stock cube, dried fruit, and nuts and/or seeds go well when wanting to prepare it with cold water.
Pasta is certainly a favourite after a big day out, and although I like to make home-made pasta, cook it, then dry it (creating a lot of extra work!), you can certainly use store- bought dried pasta of any shape. You simply cook it according to the instructions, then spread it out on the mesh sheets in the dehydrator. For longer noodles, such as spaghetti and tagliatelle, it is easier to package them if you lay them in a small spiral or ‘nest’ to dehydrate. Pasta is one of the quickest things to dry – I dry it at 1350C and it only takes a few hours. When the pasta is finished, it can feel almost as though you’ve gone through the process for nothing, as it strongly resembles its original state and, though it doesn’t make any significant weight difference (100g of uncooked penne becomes about 95g after cooking and dehydrating), it simply needs to be rehydrated by adding boiling water rather than cooking again, so the weight savings are in the gas.
Rice is prepared in a similar way – cooking it as you would normally and then dehydrating it. If you want to be more adventurous, you can make a more flavourful pilau rice, or perhaps make your favourite risotto recipe, then dehydrate. Just be sure to watch out for fats that you may normally add such as butter or oil. While some recipes that I’ve seen still allow for a small amount of oil for frying, I’ve decided to omit it altogether, to ensure that the meal doesn’t spoil. This may seem difficult at first, but I actually found it fairly simple to adapt my regular recipes. For example, for a mushroom risotto I would normally fry the mushrooms and onions first, then add the rice and let it soak up the oily goodness before adding white wine or Vermouth and finally adding vegetable broth a ladle at a time. But when preparing risotto to dehydrate, I’ve instead chosen to briefly douse the mushrooms, onions and rice in the white wine or Vermouth (I didn’t want to lose that flavour) and then begin adding a low-fat broth and letting the mushrooms and onions cook in the broth rather than frying first. For spaghetti sauce or chilli, I simply let the veg cook right in the sauce – no frying.
Potatoes also make a great base. If short on time, store-bought instant mashed potatoes are also an option and can be added to your meal. Making your own is definitely my preference though, and super easy – you can either bake or boil potatoes and grate them, or mash them (no milk or butter) and dehydrate.
In deciding what to add to your ‘base’, you can get a little more creative. The obvious thing to add to pasta would be a bolognaise sauce or vegetable tomato sauce. Another simple option, which I’ve used when I’ve had some pasta already dried out but no sauce to hand, is to add mushroom soup mix to your dried pasta for a creamy mushroom pasta – while this doesn’t give you the control over ingredients, it’s very quick to put together… and inexpensive.
Over rice, I enjoy a nice korma or some chilli. With potatoes, I like to prepare beef (or veggie ‘meat’) the way that I would for shepherd’s pie, and add some dried corn to the package too. While taking parmesan along breaks my ‘rule’ of no assembly on the trail, you could bring some along to add to your meal after rehydrating if you desire (I like to add it to pasta and risotto). And while I wouldn’t attempt to dehydrate parmesan for long-term storage, you can dehydrate it before heading out, as the dehydrated parmesan is both lighter and packs in much more flavour, meaning you need less. To do this, I follow some advice that I was given and spread it out on a ParaFlexx sheet and then put a second sheet on top to prevent the fan from blowing it around.
Snacks
Aside from creating your own ‘cook-in-the-bag’ meals, I’ve found that using a dehydrator to create snacks to take out on the trail is another great advantage. Beef jerky or tofu jerky is a great way to pack in some extra protein and being that jerky is only a quarter the weight of raw meat, it makes a great snack to bring along. Simple dried fruit chips also make a great snack, and even though you don’t dry them out completely, they weigh significantly less than their fresh counterpart, while also taking up less space. Vegetable chips shouldn’t be forgotten either, such as kale and corgette chips.
Fruit leathers are perhaps my favourite discovery and can be made by pureeing whatever fruit you’d like (I also like mixing in some yogurt and protein powder) and laying it out on the ParaFlexx sheets to dry. You can then cut it into long strips and roll it up for a nice fruity snack on the trail. We’ve also rehydrated these leathers with cold water to make a fruit smoothie to have with our breakfast!
Energy bars are another great trail item and can be made simply by combining your favourite chopped nuts, seeds and dried fruit, with some yoghurt to bind it (or other binding foods such as honey, peanut butter, apple sauce, or maple syrup), forming the mixture into bars or bite-sized balls, and drying them at 1550C. Just bear in mind that these won’t fare well during long-term storage (especially when using yoghurt) and are best eaten soon after you make them.
TRAIL TEST
After some trial and error – cooking, dehydrating, then tasting – I still didn’t feel quite ready to take a week-long supply out on a trek. But, like anything, eventually I had to just go for it and made a meal plan, prepared the food, and start packaging up the meals that I would take. Luckily, for this first true test, I would be hiking the Tour de Mont Blanc, meaning that if it all went wrong, I’d still be able to buy food along the trail. It all went surprisingly well, and my biggest mistake was perhaps making the portions too big. I now portion it before drying it as this is much easier to gauge the end product.
Like anything new, dehydrating your own trail food can be intimidating, but it can also be a lot of fun and make for great meals along the trail. It also lets you decide what ingredients you’re taking along and how they’re sourced, and adjust a meal to suit your needs, creating your own recipes that allow you to control the amount of salt, protein, carbohydrates and so on.
After having tried home dehydration, I feel that although it does take a bit of practice, I’m pleased to have given it a go – so if you’ve been sitting on the fence about trying it, my advice would be to go for it! The machine paid for itself after just the first trek – two people, two meals per day (not including our oatmeal breakfast), for 10 days, could have easily added up to a couple hundred pounds in store-bought freeze-dried meals.
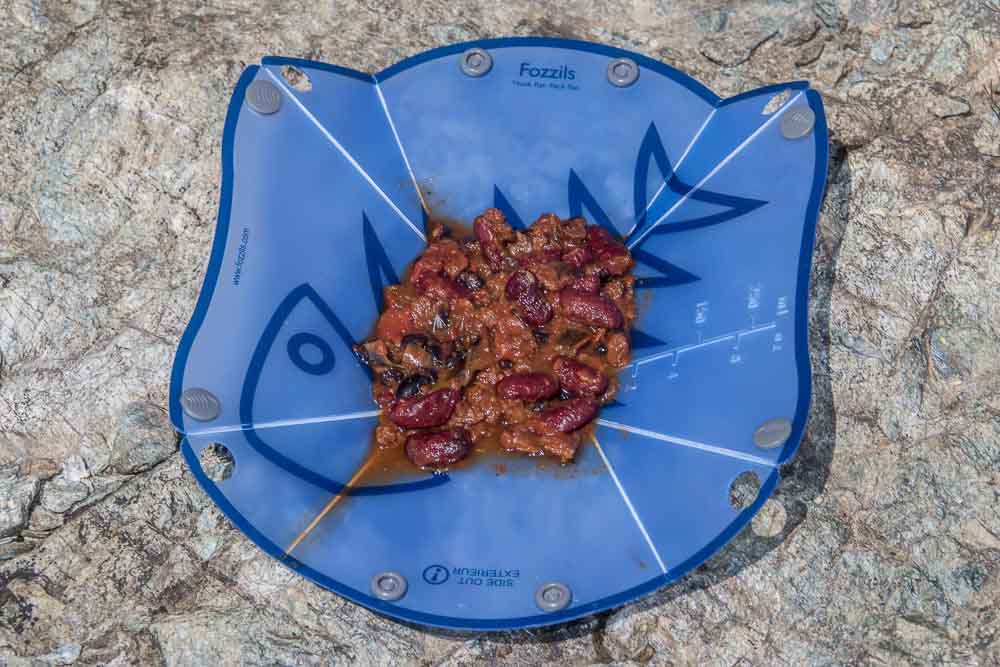 Dehydrated Chilli Con Carne
A recipe to get you started…
Chilli makes a great backpacking meal and is one of the easiest foods to make/dehydrate. I use the same recipe for both meat and vegetarian options, substituting a vegetarian ‘minced’ product (such as Quorn Meat Free Mince) for the minced beef. When chopping vegetables, remember to keep them on the smaller side and cut as evenly as possible, to aid in the drying process. I use this simple recipe, but bear in mind that any of these quantities can be adjusted to taste. I especially like to eat this served over rice, but it could also be served over potatoes or pasta, or eaten on its own.
1 pound of minced beef (or vegetarian substitute)
2 medium onions (diced)
6 celery stalks (sliced)
200g mushrooms (chopped)
2 garlic cloves (finely chopped)
1 x 400g can of kidney beans (drained and rinsed)
1 x 400g can of black beans (drained and rinsed)
2 x 400g cans of chopped tomatoes
1 x 500g container of tomato puree
1-2 tsps of hot chilli powder
1 tsp of ground cumin
Salt and pepper to taste
In a saucepan, cook the beef over medium heat until cooked thoroughly (skip this step if making a vegetarian version). Drain off any excess fat.
Combine beef (or vegetarian substitute) and all other ingredients in a large pot and bring to a boil. Lower heat and simmer until vegetable are soft.
Let cool – or better yet, keep in the refrigerator overnight to enhance flavour – and spread out evenly on lined dehydrating trays. Dehydrate at 135 degrees C until completely dry (this may take eight hours or longer). It helps to break apart any clumps of meat, beans or vegetables about halfway through drying.
MORE INFO: You can find out more about Excalibur dehydrators at www.ukjuicers.com